Boxing corners tutorial July 29, 2008
Posted by Judy in Diaper bag, Sewing projects, Tutorials.Tags: diaper bags, sewing
trackback
NOTE: found some mistakes here, so the changes are in red=)
Welcome to the “all-the-information-you-ever-wanted-to-know-about-boxing-corners” tutorial. I’ve included several different ways to box corners as well as how to design them and have them turn out the right dimensions. I’ve tried to make it clear, but it’s easy to get confused (happened to me LOTS! see Brain Strain and Ready, set, sew!), so leave me a comment if you need more help, okay?!
Let’s start by learning how to sew a boxed corner. (Of course, if you are just dying to know how the algebra works, just click on one of the links below and you’ll magically leap to that section =)
The two main methods of boxing corners are what I’m calling the “cut-out method” and the “folding method”. With both of these methods you can start out with two separate pieces of fabric that get sewn together, or you can have one piece of fabric that gets folded over.
The cut-out method
The folding method.
The cut-out method, the algebra.
The folding method, the algebra.
The cut-out method
This is the easier of the two methods, involving only two steps.
1. Once you’ve sewn the side and bottom seams, clip the corners and refold the bag (right sides together) so that the side seam matches up with the bottom seam. (If you are starting with one piece of fabric, just guesstimate where the bottom seam would be.)
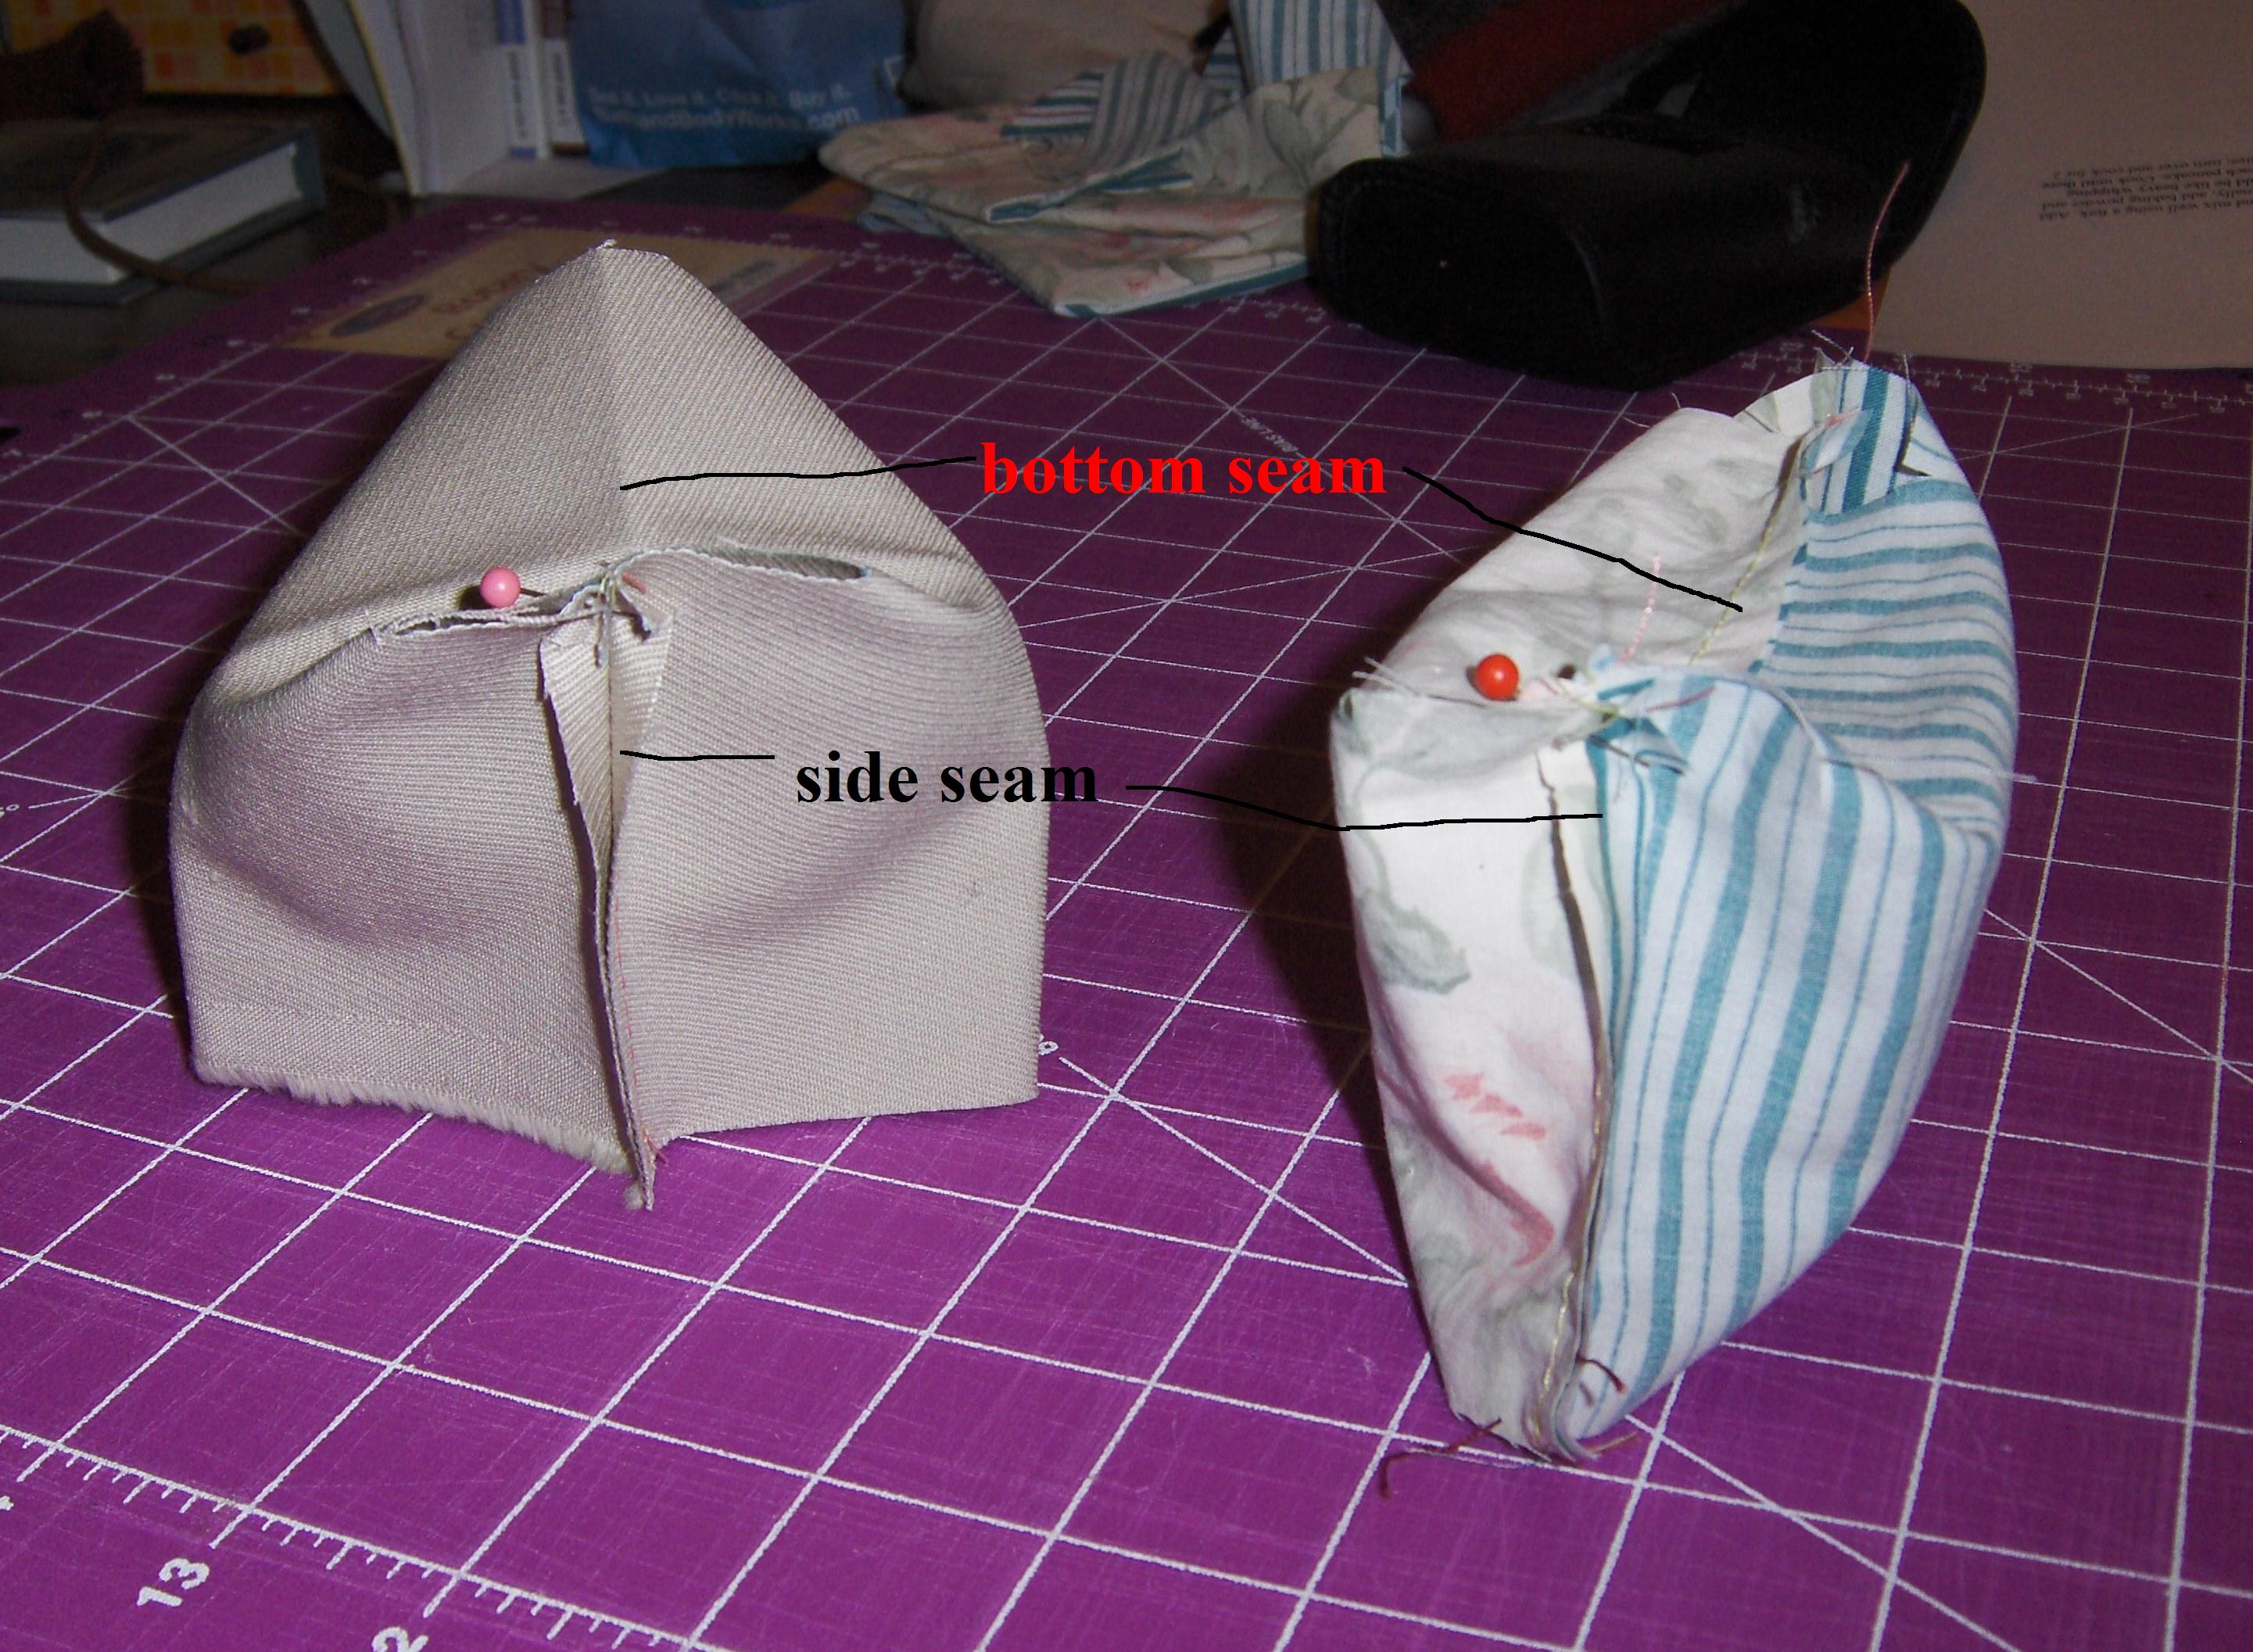
the tan box is using one piece of fabric and the other uses two pieces
2. Sew a line perpendicular to the bottom seam, usually a ¼” seam allowance is sufficient. (Some people like to sew another line 1/8” into the seam allowance for sturdiness.)

That’s it, your corner is boxed! Easier that you thought, huh? You can also check this link for more pics on the cut-out method of boxing corners. The pics are about halfway down the post. They are thumbnails, but clicking on them will give you more detail
The folding method
1. Once you’ve sewn the side and bottom seams, clip the corners and refold the bag (right sides together) so that the side seam matches up with the bottom seam. (If you are starting with one piece of fabric, just guesstimate where the bottom seam would be.)
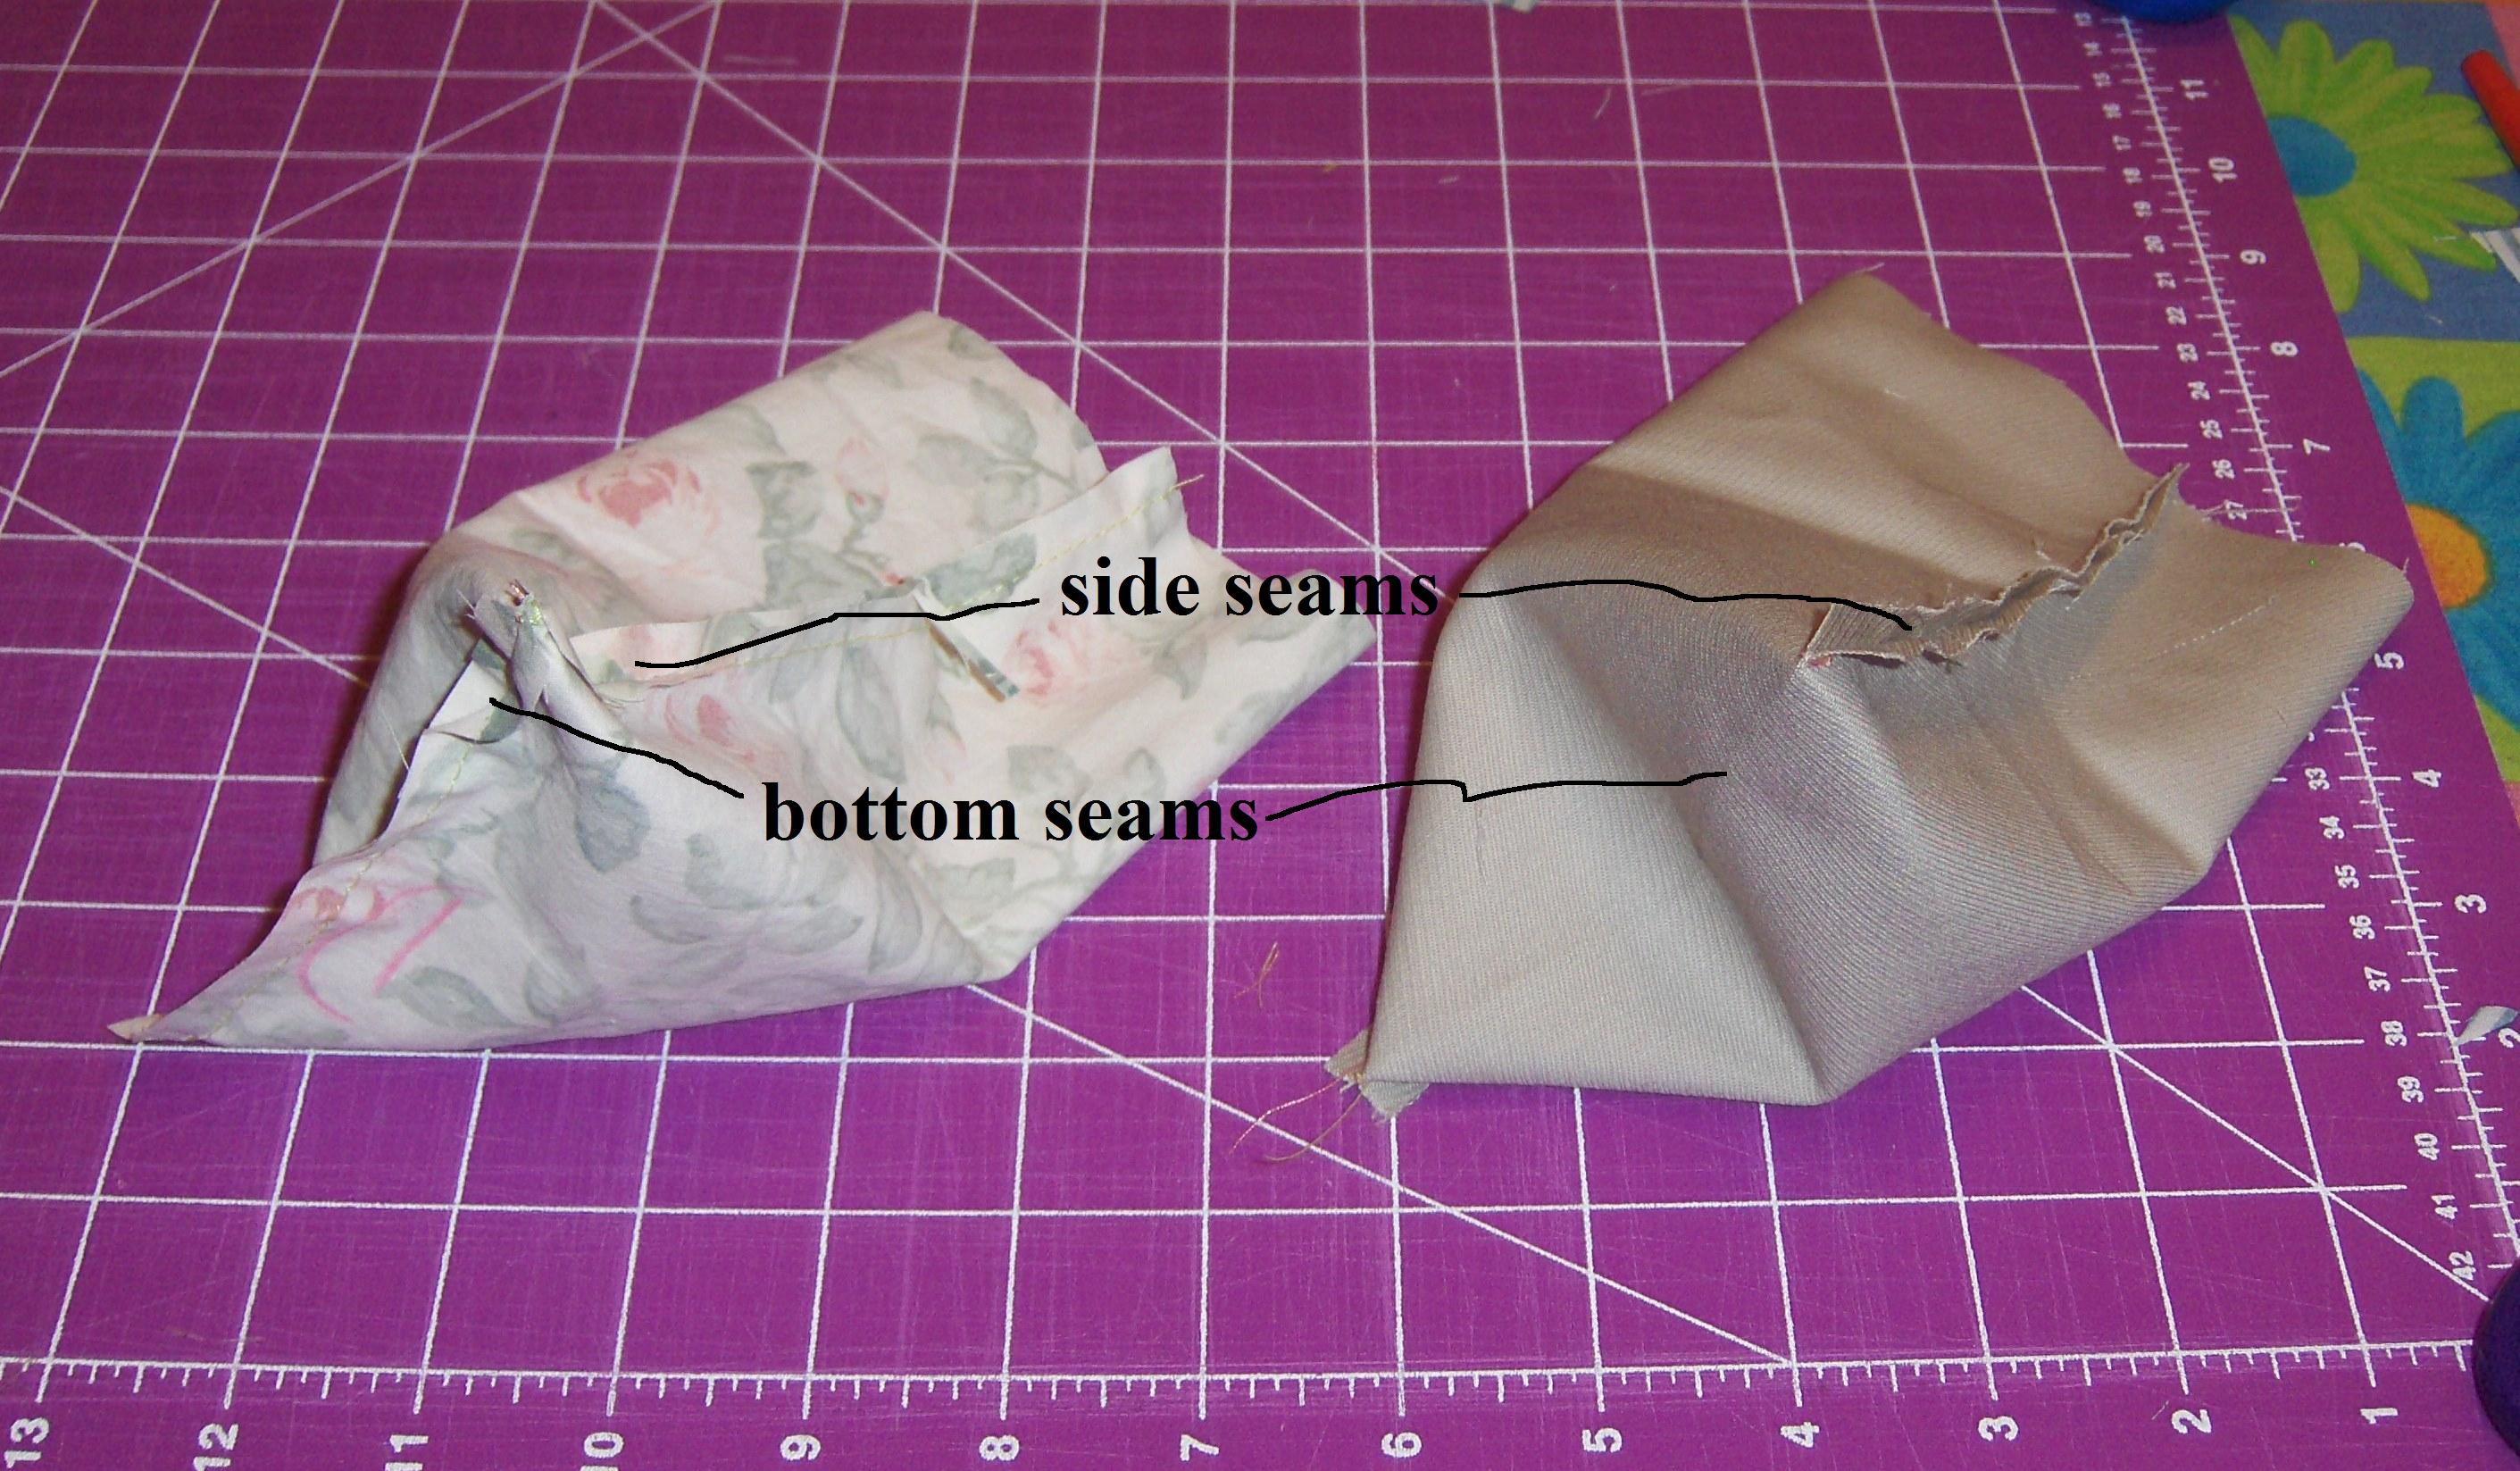
the tan box is using one piece of fabric and the other uses two pieces (sorry about the squiggly lines!)
2. Make sure that the amount on the left side of the seam is the same as the amount on the right. It might be necessary to readjust the fabric.
3. Measuring from the point, make a mark that is half the desired size of the box. For example, if you want your box to be 5” deep, then make your mark 2 ½” up from the point. Make sense?
4. Now draw a line perpendicular to the seam line at the mark and sew along this line. (Some people like to sew another line 1/8” into the seam allowance for sturdiness.)
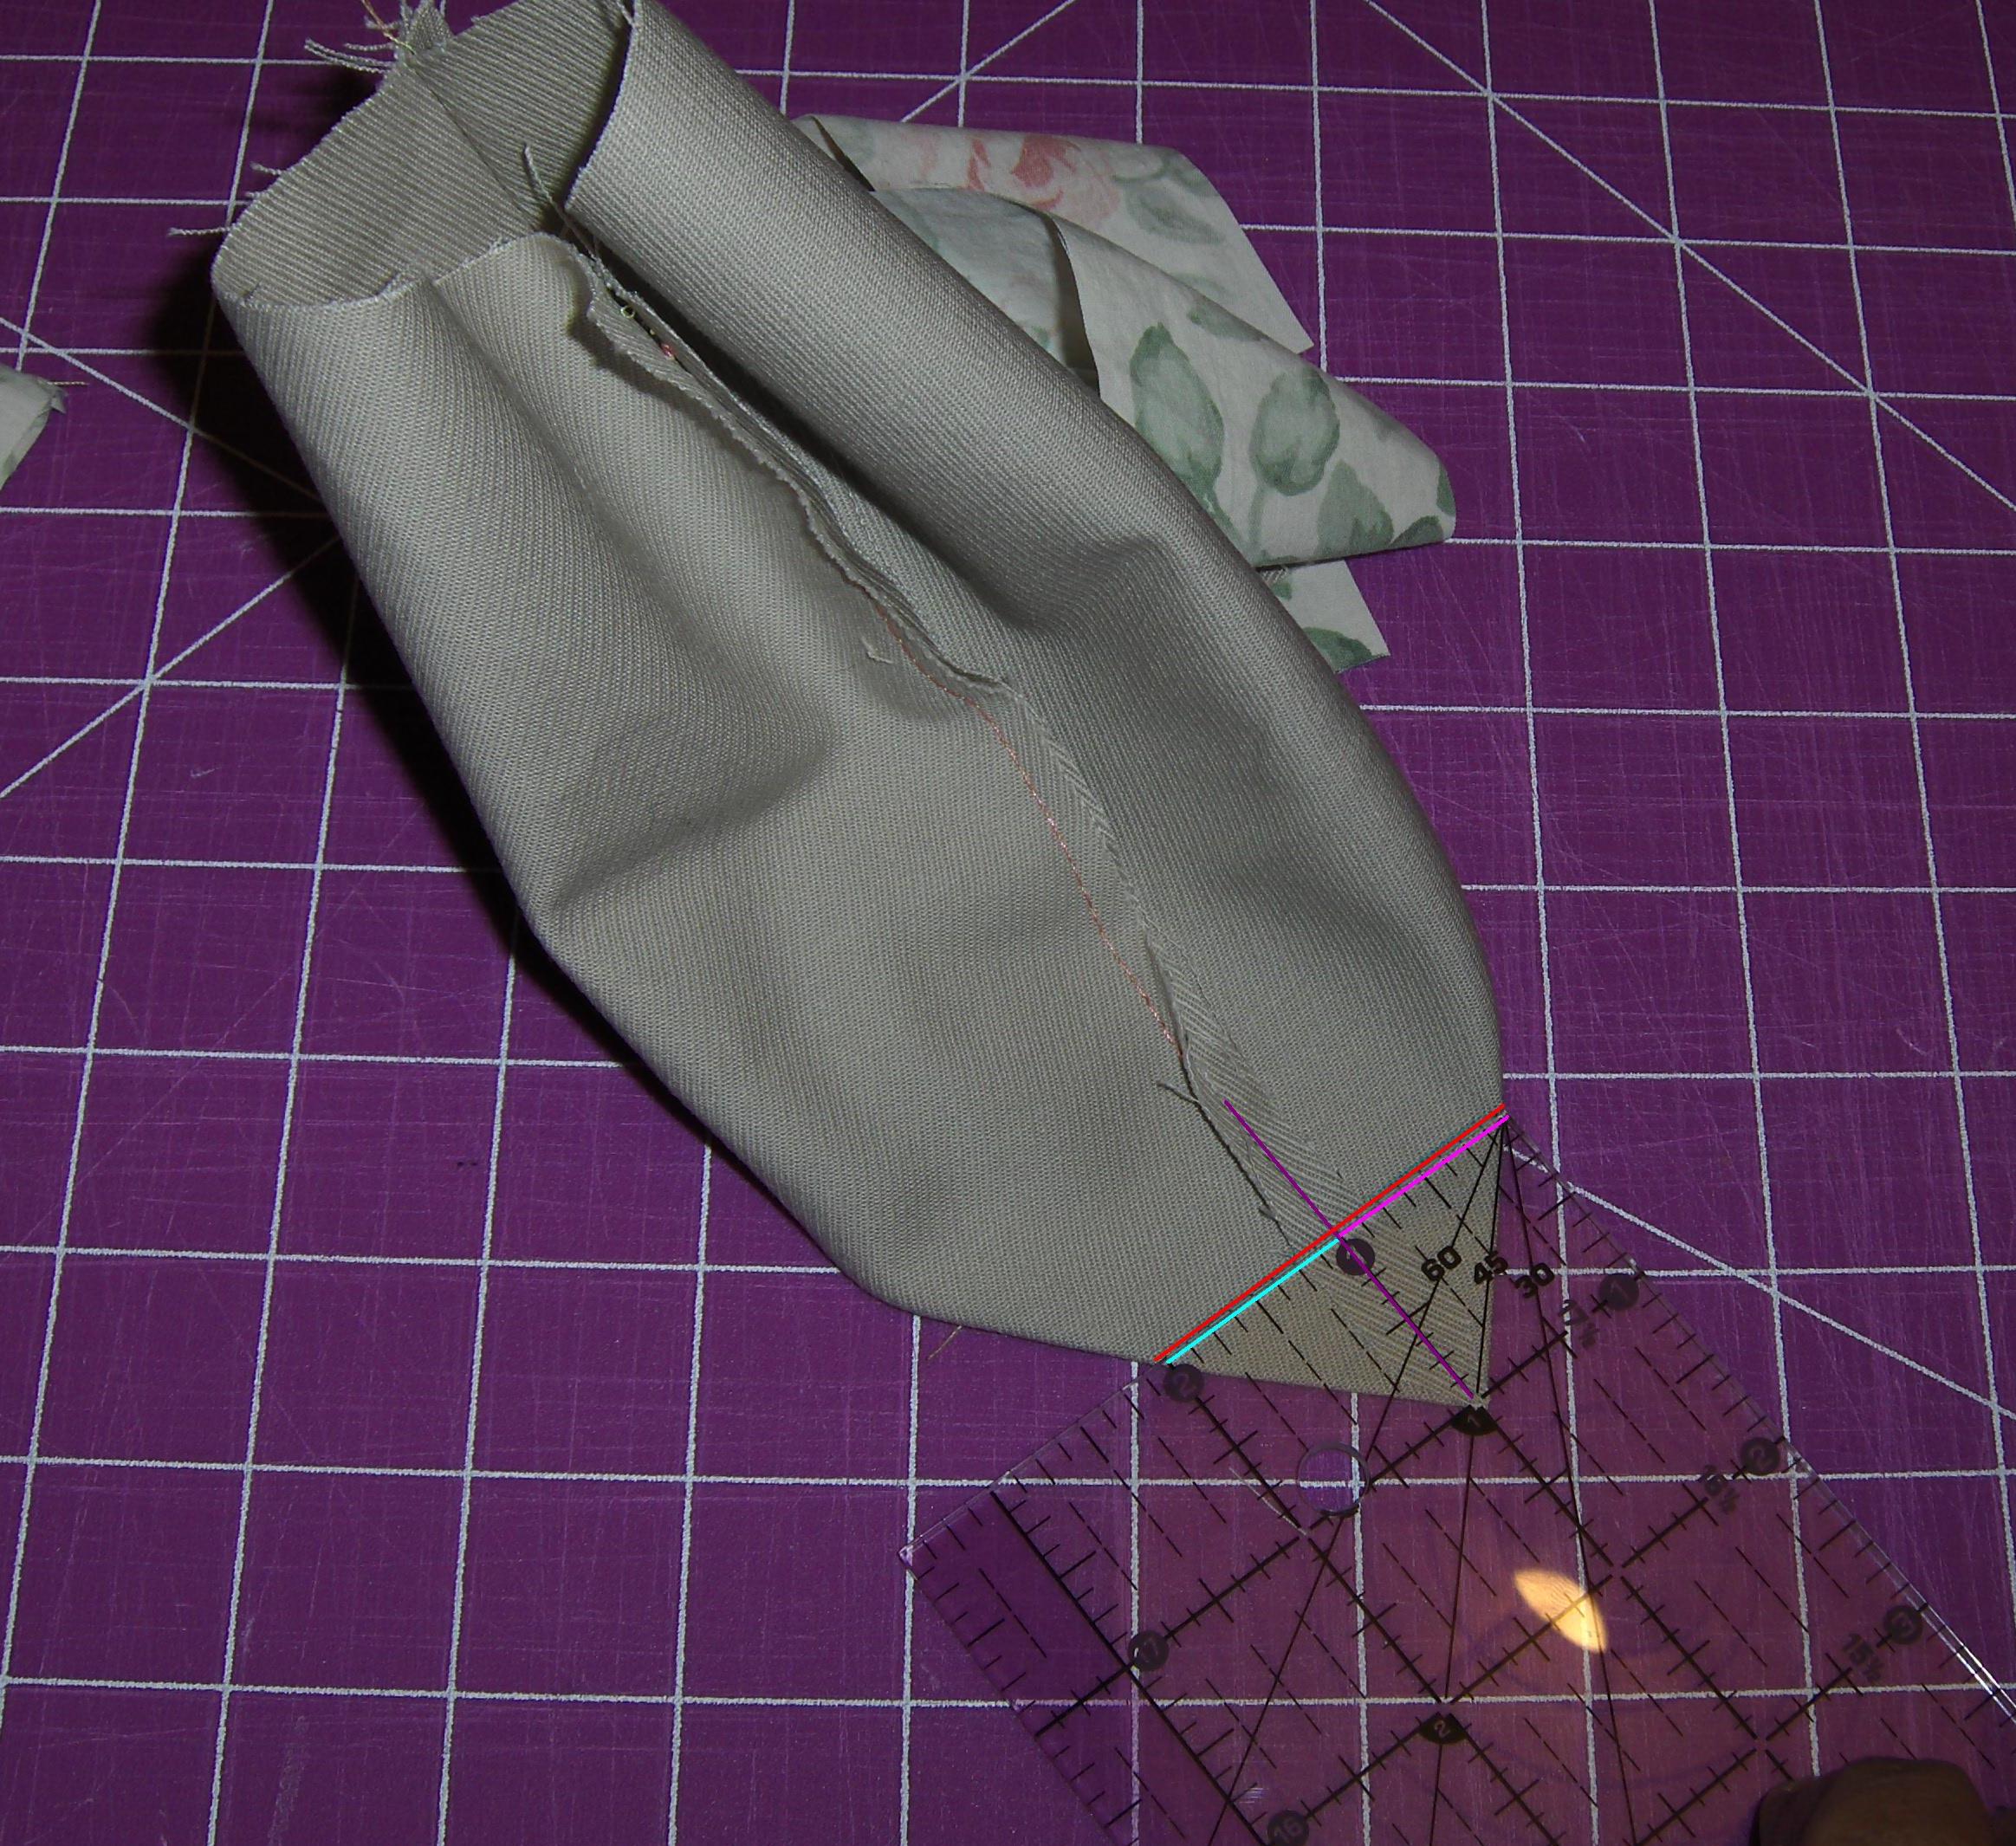
note that both the blue and pink lines are the same length. (purple=seam line, red=stitching line) (you'll probably need to click on the pic to see the detail)
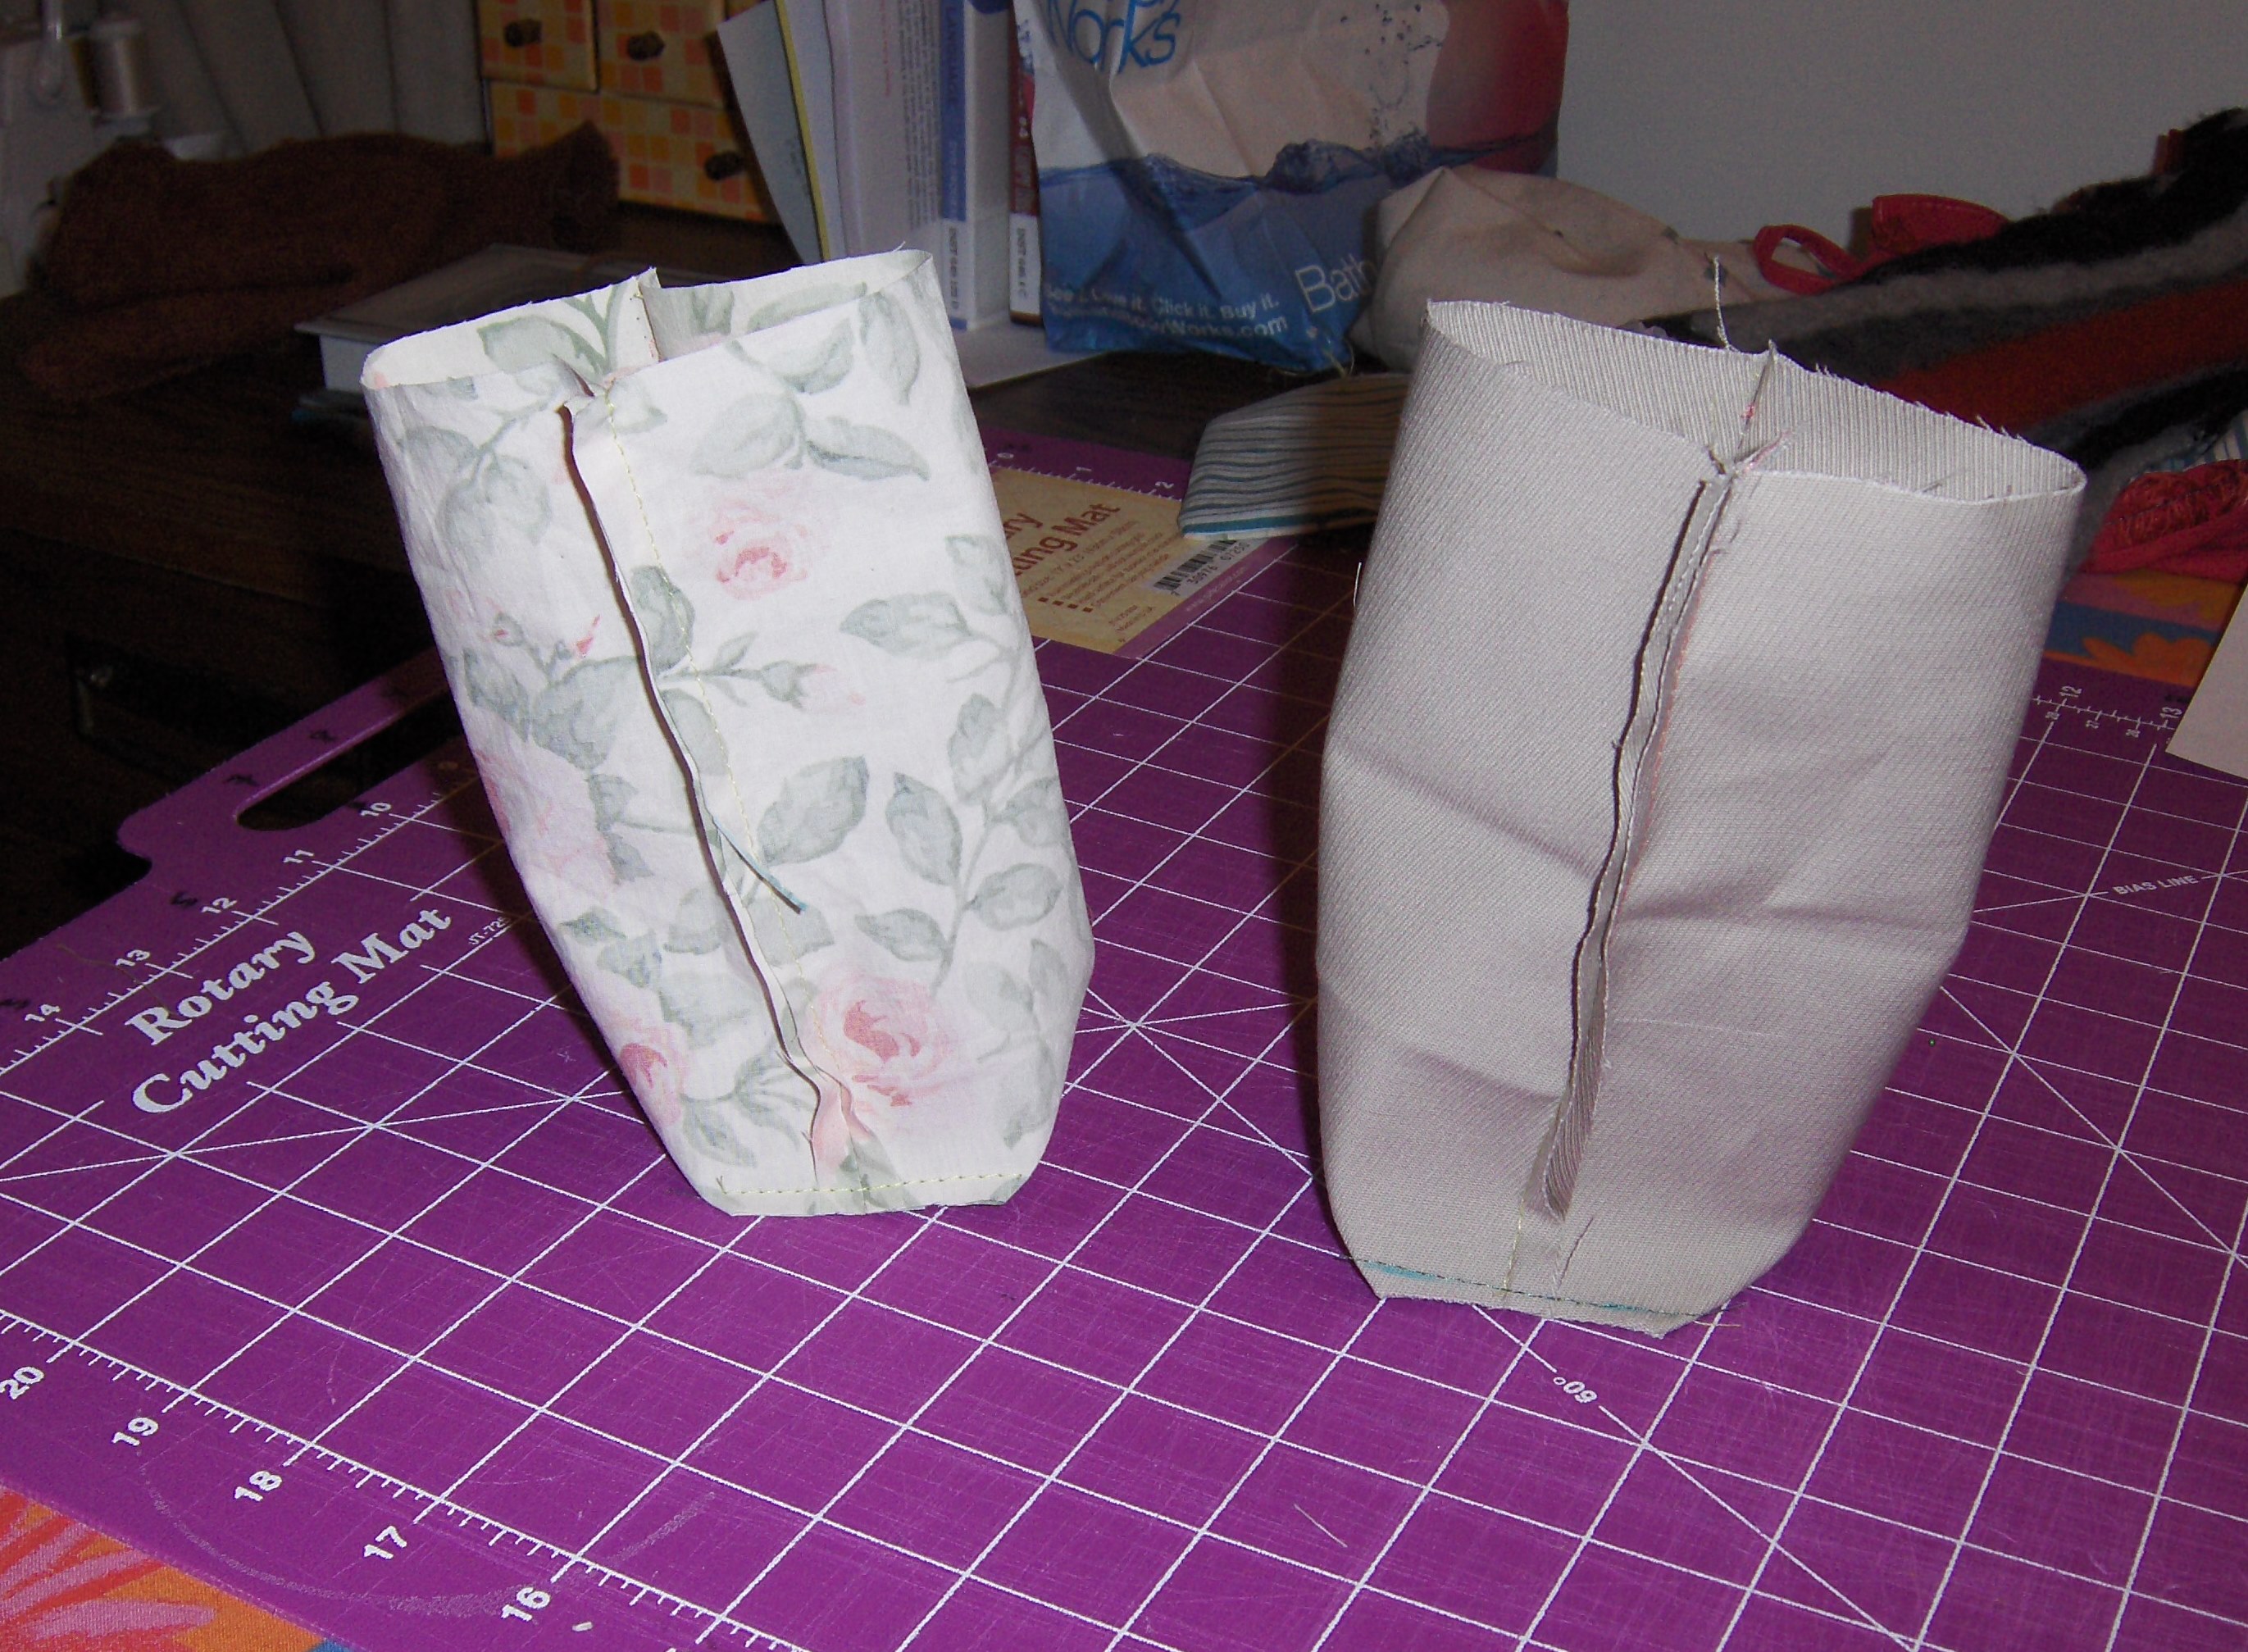
5. Trim close to the seam line.
That’s it, your corner is boxed!
Cut-out algebra
Now, suppose you want to design your own project with the “cut-out” boxed corner method, how do you know how much fabric you need? Here’s how you figure it out.
Starting with one piece of fabric
Starting with two pieces of fabric
Starting with one piece of fabric and folding
One piece of fabric – (you’d use this method if you were designing a pocket, for example)
CAVEAT: this is the version that is the trickiest for me. I’ve gotten it figured out, but I still look at the formula at times and go “huh? what? how did I get that?” so don’t worry if it doesn’t seem to make sense. Just know that it works out in the end!!
Here are the measurements that you’ll need:
– A = finished width of box
– B = finished height of box
– C = raw edge folded in
– D = depth of box
– E = seam allowance for the box
– F = fold over (this is totally optional, it just makes for a nicer looking pocket)
– G = width of fabric to cut
– H = height of fabric to cut
– I = vertical cut for notch
– J = horizontal cut for notch
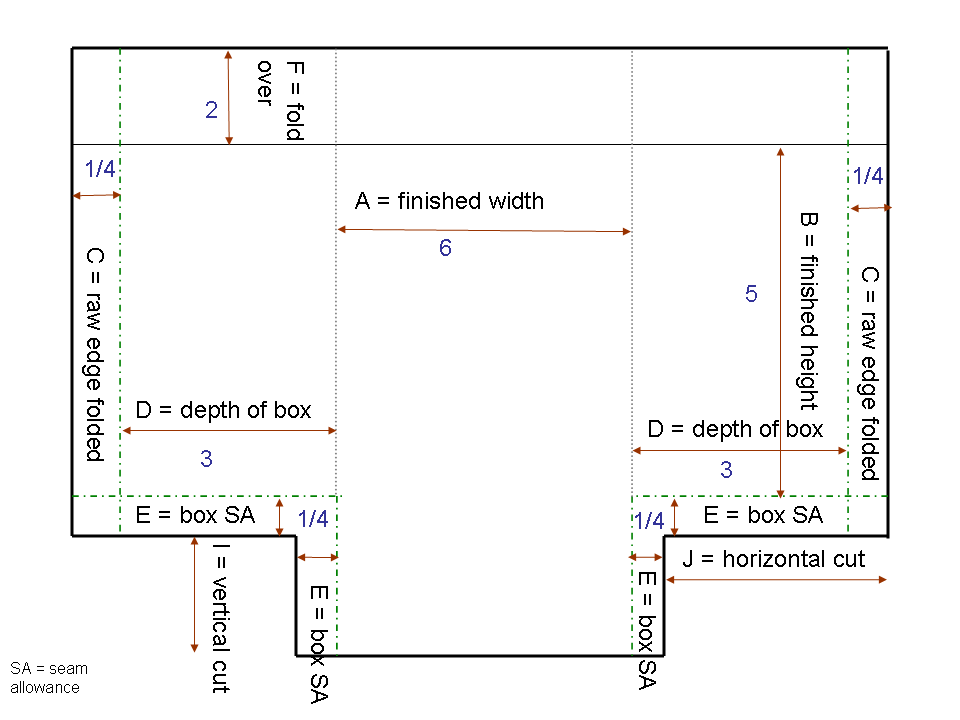
These are the magic formulas:
A + (D x 2) + (E x 2) + (C x 2) = G
B + F + E + D = H
D + E = J
D = I
Here’s an example using the drawing above.
A = 6 inches
B = 5 inches
C = ¼ inch
D = 3 inches
E = ¼ inch
F = 2 inches
So plugging in the numbers, here’s what you end up with:
6 + (3 x 2) + (¼ x 2) + (¼ x 2) = 13 (this is G)
5 + 2 + ¼ + 3 = 10¼ (this is H)
3 + ¼ = 3¼ (this is J)
So you’ll want to cut your fabric 13 x 10¼
You’ll want to cut a notch in each lower corner that is 3 inches tall and 3¼ inches wide.
Back to top Back to cut algebra
Two pieces of fabric – (you’ll use this method if you will be sewing a seam at the bottom of the purse/bag/etc.)
– A = finished width of box
– B = finished height of box
– C = seam allowance
– D = depth of box
– E = seam allowance for the box
– F = top seam allowance (used if you are attaching lining or if you’ll fold under the raw edge)
– G = width of fabric to cut
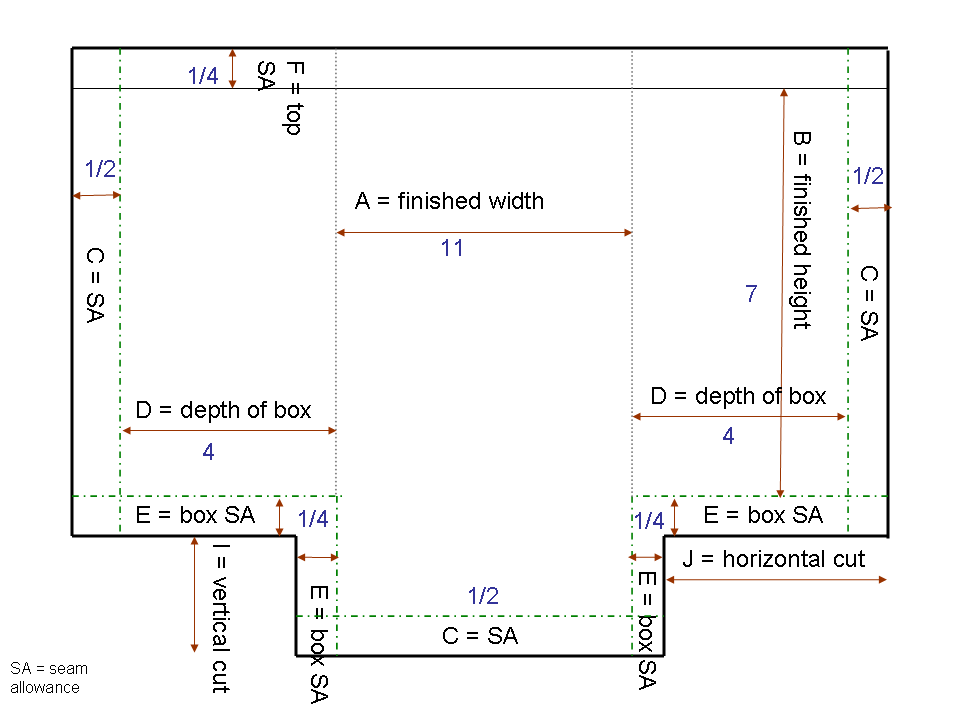
These are the magic formulas:
A + (E x 2) + D + (C x 2) = G
B + F + E + (D/2) + C = H
(D/2) + C – E = J
J = I
Here’s an example using the drawing above.
A = 11 inches
B = 7 inches
C = ½ inch
D = 4 inches
E = ¼ inch
F = ¼ inches
So plugging in the numbers, here’s what you end up with:
11 + (¼ x 2) + 4 + (½ x 2) = 16½ (this is G)
7 + ¼ + ¼ + (4/2) + ½ = 10 (this is H)
(4/2) + ½ – ¼ = 2¼ (this is both J and I)
So you’ll want to cut your fabric 16½ x 10
You’ll want to cut a notch in each lower corner that is 2¼ inches tall and 2¼ inches wide.
NOTE: The depth of your box will actually end up being be the seam allowance for the box (E), which is ¼ inch in our example. I know it has to do with the box seam allowance, I just haven’t figured out how to account for that. But I figure ¼ inch is no biggie, it could be chalked up to a cutting or measuring error. If you have an idea on how to solve this, let me know! Hooray! DH helped me figure this out, so you’ll notice the new and improved formula. BUT, given the nature of how this particular box works, if your measurements are off at all (seam line isn’t exactly right, fabric isn’t perfectly straight, etc), the box will end up being either bigger or smaller than intended. *SIGH*
Back to top Back to cut algebra
One piece of fabric that is folded – (you’ll use this if you WILL NOT be sewing a seam at the bottom of the purse/bag/etc.)
– A = finished width of box
– B = finished height of box
– C = seam allowance
– D = depth of box
– E = seam allowance for the box
– F = top seam allowance (used if you are attaching lining or if you’ll fold under the raw edge)
– G = width of fabric to cut
– H = height of fabric to cut
– I = vertical cut for notch
– J = horizontal cut for notch
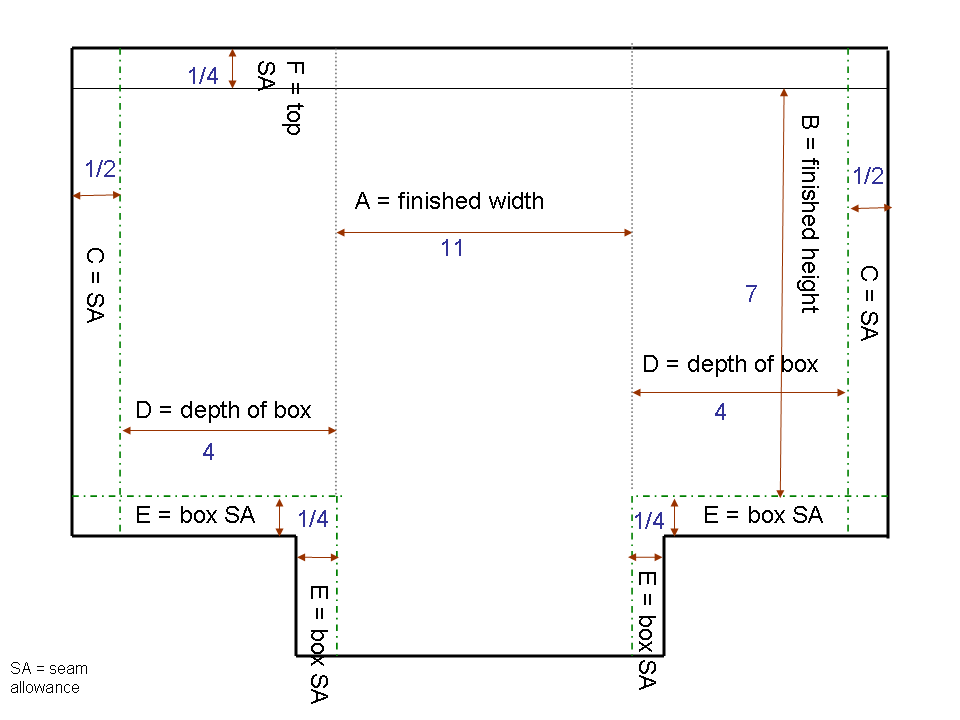
These are the magic formulas:
A + (E x 2) + D + (C x 2) = G
(B x 2) + (F x 2) + (E x 2) + D = H
(D/2) + C – E = J
D – (E x 2) = I
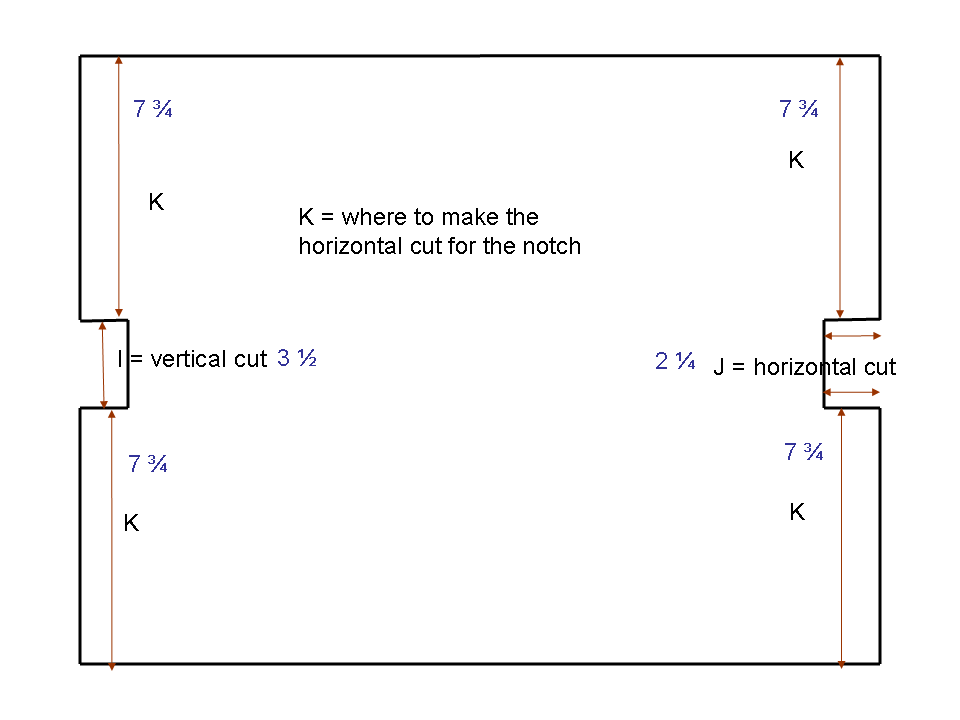
(H – I)/2 = K
Here’s an example using the drawing above.
A = 11 inches
B = 7 inches
C = ½ inch
D = 4 inches
E = ¼ inch
F = ¼ inches
So plugging in the numbers, here’s what you end up with:
¼ + 7 + ¼ = 7½ (this is K) (19 – 3½)/2 = 7 3/4 (this is K)
So you’ll want to cut your fabric 16½ x 19
You’ll want to cut a notch 7 3/4 inches from each end that is 3½ inches tall and 2¼ inches wide.
NOTE: The depth of your box will actually end up being be the seam allowance for the box (E), which is ¼ inch in our example. I know it has to do with the box seam allowance, I just haven’t figured out how to account for that. But I figure ¼ inch is no biggie, it could be chalked up to a cutting or measuring error. If you have an idea on how to solve this, let me know! Hooray! DH helped me figure this out, so you’ll notice the new and improved formula. BUT, given the nature of how this particular box works, if your measurements are off at all (seam line isn’t exactly right, fabric isn’t perfectly straight, etc), the box will end up being either bigger or smaller than intended. *SIGH*
Back to top Back to cut algebra
Folding algebra
If you are designing your own project with the “folding” boxed corner method, here’s how you figure out your fabric needs. (Of the two methods, this is definitely the easiest one to design!)
Starting with one piece of fabric
Starting with two pieces of fabric
Here are the measurements that you’ll need:
– A = finished width of box
– B = seam allowance
– C = depth of box
– D = width of fabric to cut
– E = finished height of box
– F = height of fabric to cut
These are the magic formulas:
A + (B x 2) + C = D
C + (E x 2) = F
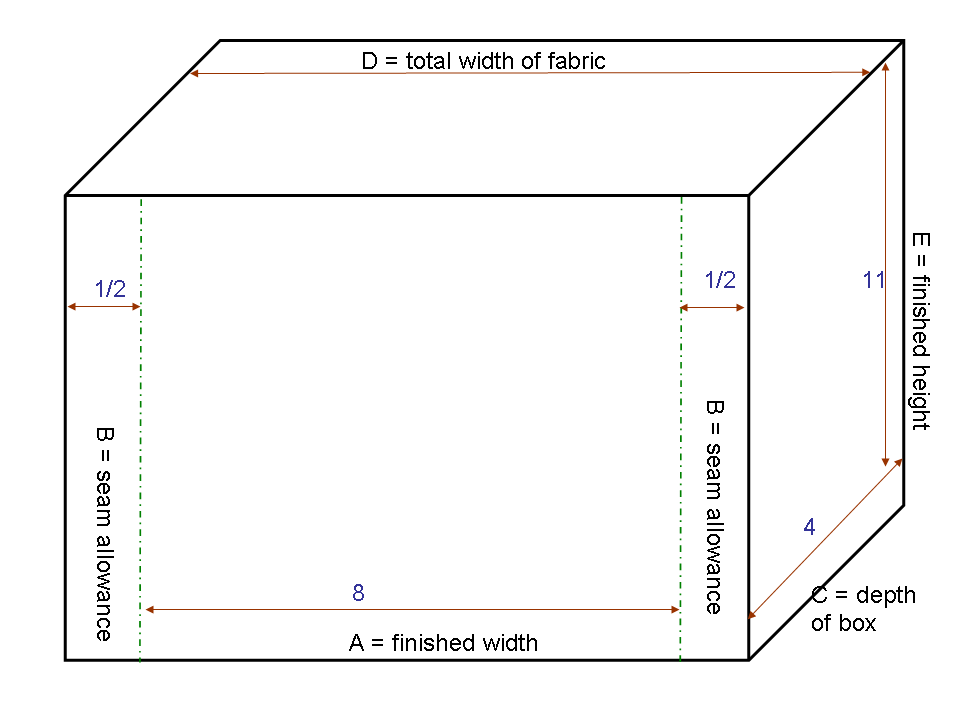
Here’s an example using the drawing above.
A = 8 inches
B = ½ inch
C = 4 inches
E = 11 inches
So plugging the numbers in, here’s what you end up with:
8 + (½ x 2) + 4 = 13 (this is D)
4 + (11 x 2) = 26 (this is E)
So you’ll want to cut your fabric 13 x 26
NOTE: you’ll need to add more to the height if you’ll be making a casing or will be folding over the raw edges.
Back to top Back to folding algebra
Two pieces of fabric
CAVEAT: You can do this method with two pieces of fabric, but I’ve found that it works better to start with one and fold it in half.
Here are the measurements that you’ll need:
– A = finished width of box
– B = seam allowance
– C = depth of box
– D = width of fabric to cut
– E = finished height of box
– F = bottom seam allowance
– G = height of fabric to cut
These are the magic formulas:
A + (B x 2) + C = D
(C/2) + E + F = G
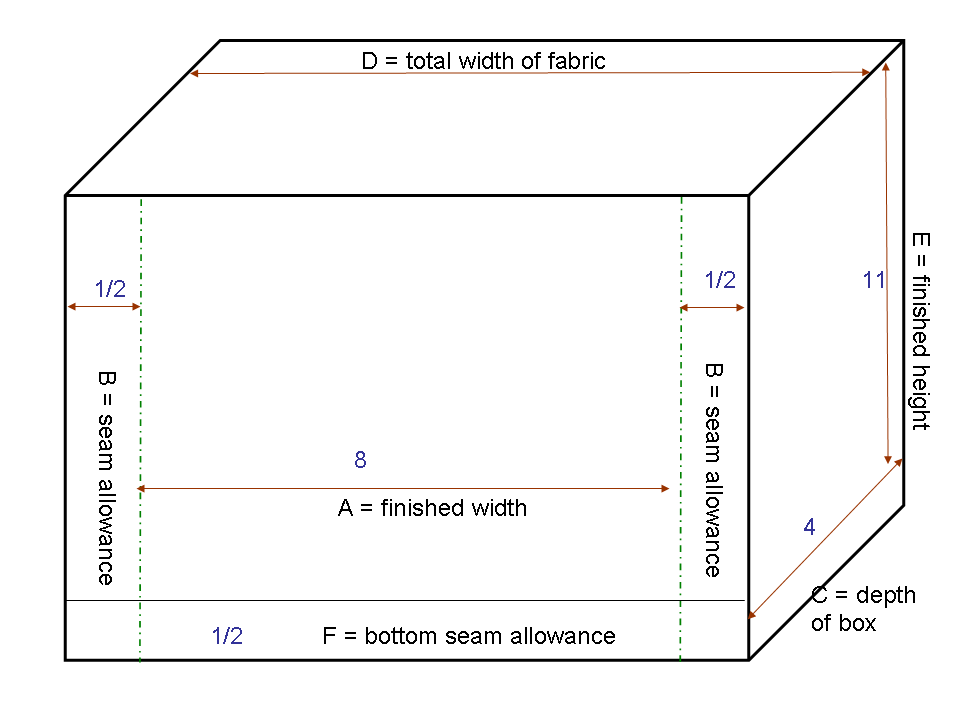
Here’s an example using the drawing above.
A = 8 inches
B = ½ inch
C = 4 inches
E = 11 inches
F = ½ inch
So plugging the numbers in, here’s what you end up with:
8 + (½ x 2) + 4 = 13 (this is D)
(4/2) + 11 + ½ = 13 ½ (this is F)
You’ll want to cut each piece of fabric to be 13 x 13 ½
NOTE: you’ll need to add more to the height if you’ll be making a casing or will be folding over the raw edges.
Back to top Back to folding algebra
Wow! You made it through all of that . . . .CONGRATS! You should now have a really good handle on how to sew and design boxed corners. If you have any questions or problems, leave me a comment and we’ll tackle it together! Happy boxing!! =)

Hi. I just stumbled on your tutorial and I just have to say…WHEW! I’m so glad there’s a formula. 🙂 I’ve calculated measurements the hard way (trial & error) and have gotten most of it down, but when I make something differen…well, there goes another batch of trail bags. LOL! Thanks so much for figuring all of this.
I have also made LOTs of trial bags! I’ve found that the formulas are sound . . . now if only I could get my sewing PERFECT every time, I’d be golden=) Glad to be able to help.
Hi,
Do you have a picture of the final bag?
Not yet. I have the post all written up, I just need to get some good pics of the bags and upload them, in all of my spare time! LOL!
A very interesting blog post. What would you say was the most common problem?
The most common problem to what? Boxing corners? Now that I’ve gotten the formulas down, there aren’t any problems=)
Found this post after following a pattern this afternoon where the instructions were to box the corner and I could not figure what in the world they were talking about. Made the handbag anyway (and really did not turn out not too bad) but I am certainly glad I found your tutorial for future reference. The pictures and descriptions were great. Thanks alot.
Thanks…
Thanks for the great information. I created a small XLS spreadsheet that lets you enter in the size of tote bag you want to make and then calculates the sizes of the fabric to cut. You can check it out on my web site at http://bennettplanet.com/archives/109.
Great idea to create an Excel spreadsheet! Let IT do the thinking for you =)
Wow! Just found this on Pinterest… You are awesome! Thanks for sharing!
You are a GENIUS!!! I have been searching and searching for this…YAAY!!! I am so Happy. You have all the answers to this dilemma. Thank you so much.
Absolutely the BEST!! Tutorial I have found. You not only explain how to make the boxed corners, but how to figure out your own custom dimensions. Thanks so much. GENIUS!!
Can someone please tell me how to create the cut out box illustrations….I would like to make some for myself that pertain to my particular measurements.
I believe that I just used the drawing tool in Word to make the boxed illustrations.
Thanks so much.
Well, I’m assuming this group is inactive???
Hi could you please help me figure out a formula for this. I would like the finishrd width to be 16 inches and the finished height to be 15 inches with a 3 inch finished box bottom. The seam allowances I’m going to use will be 3/4 inches on each side and the seam allowances around the Box cut out bottom will also be 3/4 inches so all seam allowances are 3/4 inches. Can you help me figure out the formula if I’m going to use two pieces of fabric and also a formula if I’m going to use 1 piece of fabric…. thank you so much I’ve been stressing and having a hard time figuring this out. Also can you tell me how big to make the template for the little cut outs.
I have an Excel spreadsheet that allows me to enter the desired size of the tote bag and it calculates the size of the fabric and cutouts for me. You can see details (and download the spreadsheet) at http://bennettplanet.com/archives/109
This allows you to sew a tote bag like the one on Inspired Wren’s web site at http://theinspiredwren.blogspot.com/2014/04/tutorial-lined-canvas-tote.html
The tote bag has a lower panel in a contrasting color.
Although the instructions include how to make the handles, I prefer to use 1.25″ or 1.5″ wide cotton webbing instead.
I entered your desired size of 16″ wide, 15″ tall and 3″ deep (which is what I think you mean by a 3″ box bottom) with 3/4″ seam allowances and came up with the numbers for you. Just download the spreadsheet and fill out the desired size and you’ll get the answers you are looking for.
I hope this helps!
Hi, Can you explain the “height percent from bottom panel”…what does this mean? I want my tote to be made all from the same fabric without panels. How do i calculate this? Hope this makes sense 🙂
Hi Barbara! Thanks for your question.
So to use just one piece of fabric you would plug all of your numbers into the second one-piece of fabric formulas. Here’s what you would have:
16 + (.75 * 2) + 3 + (.75 * 2) = G (width to cut)
(15*2) + (1*2)+(.75*2)+3 = H ( height to cut)
(3/2)+ .75 – .75 = J (width of cut-out notch)
3 – (.75*2) = I (height of cut-out notch)
If you are using two pieces of fabric, you’d plug the same numbers into that set of formulas. For F (fold over at the top), I used 1 inch
16 + (.75 * 2) + 3 + (.75 * 2) = G (width to cut)
15 + 1 + .75 + (3/2) + .75 = H (height to cut)
(3/2) + .75 – .75 = J = I (height and width of cut-out notch
Hope this helps. LMK if you need more help!
There’s also a comment after mine from someone named Steve. He appears to have a spreadsheet on his website. I cannot vouch for it’s accuracy as I haven’t tried it out, but that might be another option for you.
Good luck!
Hello thank you so much for replying. I’m a little confused with the section that starts out under the heading “cut out algebra.”
The very first diagram using one piece of fabric says to use this set of instructions if you’re designing a pocket, with that in mind would I be using this set of instructions?
The next set of instructions is for designing a tote using two pieces of fabric I understand this one is where you sew a seam at the bottom.
Then the next set of instructions is for 4 a tote using one piece of fabric where the bottom is folded and there is no bottom seam… This particular one shows a diagram with the cutouts at the bottom but what really confuses me is if I read further down for that same set of instructions there is another diagra… can you please tell me what that one is for, because it’s included in the same set of instructions… So basically explain this one and also the very first one at the top that’s for designing a pocket thank you.
I was searching for a formula to figure out what size squares to cut out for boxing corners in a lining for a tote bag I’m making, and having a hard time wrapping my head around the math. I was able to calculate the size fabric I needed to cut, but wasn’t sure of the size square for boxing. Your formulas saved the day (and my brain). I’m saving this information to use for other tote bags I plan on making. Thank you for posting this, and taking the time to do the math!!!
Pure genius!
Just pulling fabric for tote bag and wondering how much I would need. Mucho gracias!
✂️ 0️⃣ ✂️ 0️⃣